
How to Dermaplane at Home for a Game-Changing Beauty Routine
If you're not familiar with dermaplaning, today I'm going to explain how to dermaplane at home for a flawless finish you will love. I'll share my personal at-home dermaplaning routine and my go-to products.
This post contains some affiliate links for your convenience. Click here to read our full disclosure policy.
We are a participant in the Amazon Services LLC associates program an affiliate advertising designed to provide means for us earn fees by linking amazon.com and affiliated sites. we may commission on qualifying sales at no additional cost you.
Here's Why I'm Obsessed With At-Home Dermaplaning (And You Will Be Too!)
Learning how to dermaplane at home was a game-changer to my beauty routine. If you've never shaved your face (or had it done professionally) you're missing out!
If you’re looking for a skincare treatment that delivers instant results without having to leave the house or pay the price at the spa, dermaplaning at home will probably be your new favorite beauty ritual.
This manual exfoliation method removes dead skin cells and "peach fuzz" (technically known as fine vellus hair). Afterwards, a smooth, radiant complexion is revealed. It’s quick, easy, affordable, and incredibly effective.
What Is Dermaplaning?
Dermaplaning involves using a small facial razor to gently scrape away dead skin and fine hairs from the surface of your face. Unlike harsh scrubs or acid-based exfoliants, dermaplaning provides immediate visible results with no down-time.
4 Immediate Benefits (Yes Please!)
1. Better Skincare Absorption
Your serums and moisturizers will penetrate more deeply when there’s no dead skin in the way. That means your products will work better and last longer.
2. Smoother Makeup Application
With dead skin and peach fuzz removed, your foundation and concealer will glide on so easily and you'll find you will use less.
3. Brighter, More Glowy Skin
By removing the top layer of dull, dead skin cells, you’ll notice an instant glow and a more even skin tone.
4. Softens the Look of Fine Lines
Freshly dermaplaned skin is smooth, making fine lines less noticeable and giving your skin a plumper, more youthful appearance.
No, It Won’t Make Your Hair Grow Back All Stubly!
One of the biggest myths around dermaplaning is that shaving your face will make the hair grow back darker or stubbly.
Truthfully, it won’t! Hair grows back the same color and texture as before — you'll just notice it more because it’s growing in all at once.
I've had my skin dermaplaned either professionally or at home for years and can promise you that my facial hair is the same once it grows back.
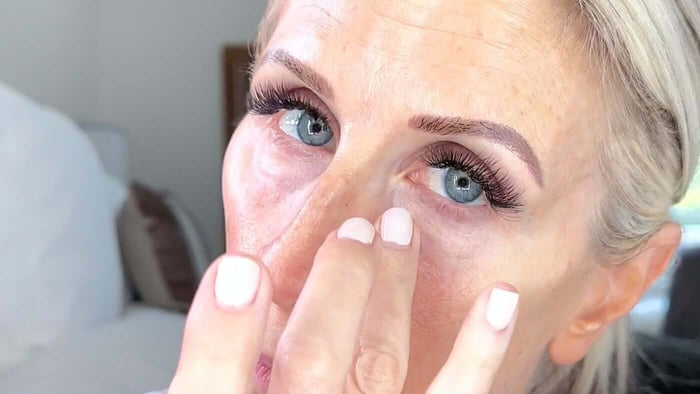
How to Dermaplane at Home
These are the products I use for my at-home dermaplaning routine:
Best At-Home Dermaplaning Tool

$7
This is the best tool I've tried for at-home dermaplaning. These little disposable razors work great, and are super affordable. If you’re not doing at-home dermaplaning, you’re really missing out! It’s so affordable and easy to do, and the results… read more
Night Time Facial Oil

$45
This night time face oil blends effortlessly into the skin and has a wonderful scent. It keeps my skin moisturized and illuminated. I've been using this product regularly at night for a couple of years now. I like that… read more
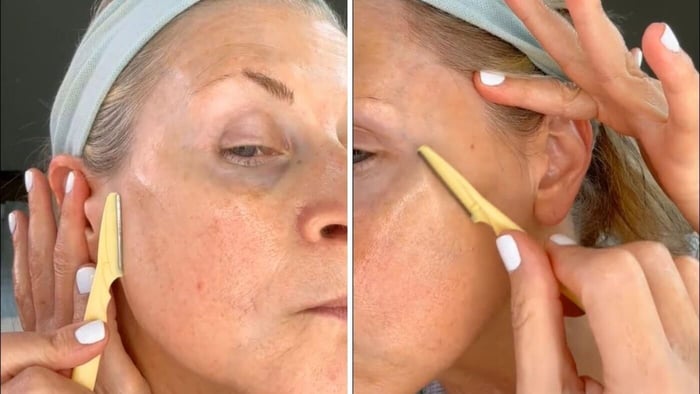
Here’s how to dermaplane at home (my routine):
Start with clean, dry skin.
Apply a facial oil – this helps the blade glide smoothly (important!!)
Using a brand new razor, work in short, downward strokes at a 45-degree angle.
Take your time and go easy – no need to apply pressure.
Follow up with your favorite moisturizer or serum. (Sometimes the remaining oil left on my skin is enough and I skip this step.)
Dispose of the razor when finished.
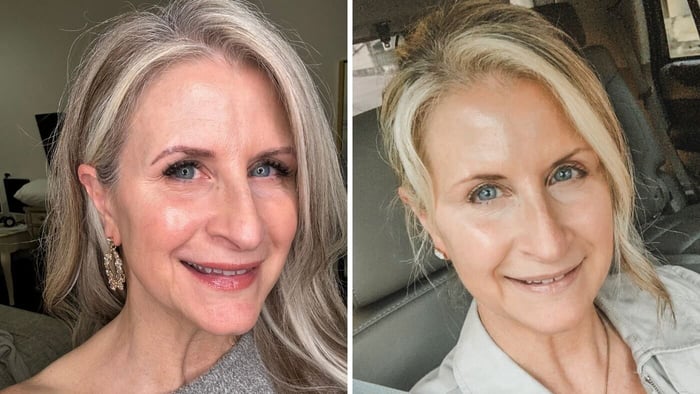
Do this once every 3-4 weeks and you will love your skin. The results speak for themselves — soft, glowing skin, and a perfect canvas for makeup.
I like to plan my at-home dermaplaning a few days before an event, so my skin looks its best.
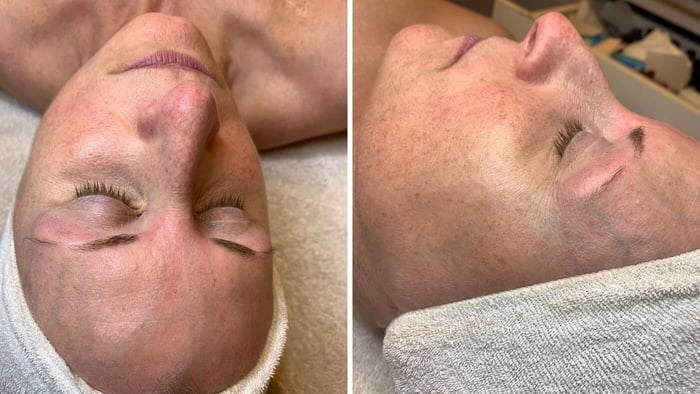
Both of the following pictures were taken a day or two after dermaplaning. The one on the right is in Summer while wearing self-tanner. I don't have "before and after" pics for you since I dermaplane regularly so I rarely have full peach fuzz growth. I will try to remember to take a "before" picture next time to add to this post!
Downside to At-Home Dermaplaning
I've had dermaplaning done professionally by my esthetician several times and the results I get with my DIY dermaplaning at home are comparable. However, it's certainly not as relaxing as laying on a facial bed and letting someone else do the work. That is truly a treat! (The first image in this post is from a dermaplaning appointment a few years ago.)
But although not as relaxing as having this service at the spa, understanding how to dermaplane at home will be a game changer for you. The glowy appearance of your skin will make this a non-negotiable part of your beauty routine.
If you haven’t tried dermaplaning at home yet, now’s the time. I hope this post has helped you understand how to dermaplane at home for immediate results. It’s honestly one of the easiest ways to seriously upgrade your skincare routine — and once you see the glow, you’ll be hooked!
Related Posts
The Best Dry Shampoo for Those Dirty Mom Hair Days
No-Makeup Makeup: My Essential Products for a "No-Makeup" Look
Best Makeup Cleansing Balm - Watch Makeup Melt Away!